Now anyone who has ever taken on a home renovation project will know that no matter what size it is there is stuff you expect to have to do and stuff that you never do, but end up doing anyways. Ironing my kitchen floor definitely falls into the second camp.
Despite knowing that the floor boards in the kitchen are quite soft (i.e. bruise like a peach) and that stilettos don't mix with wood floors I threw caution to the wind last night. So after a good half hour of tramping back and forth making dinner I happened to look down to find my floor looking like someone had taken a meat tenderizer to it. EEK! All that hard work down the drain....
So once I stopped hyperventilating about the floor I did what all girls in such a situation would do. I picked up my phone and called for help (in this case my Father-in-law). Now his mystical yoda like master furniture maker friend had told him some story about how to get dents out of wood. Here was the perfect chance to test this out. The solution...iron the wood.
You are probably pretty sceptical, but let me explain the mechanics. Take one iron and put it on really hot and steam. While heating up take a piece of thin cotton (I used a napkin) and get it pretty wet, but not dripping. Spread cloth flat over dent and use prepped iron to iron the piece of cloth. Now when the hot iron hits the cloth it will hiss quite a lot and force out steam. This steam works into the dented fibers of the wood and expands them..et voila no dents.
Was I sceptical? Yes. Did it work? Pretty well, but can still see some dents. I think next time though I'll just take my shoes off.

Sunday 20 February 2011
Sunday 13 February 2011
Storage begins to appear
So now that most of the big stuff is done we're starting to work on putting together all of our storage. Believe me it's needed!! Only problem is with a house as old as ours you have to build everything bespoke (think no square corners) and it takes twice as long. Here are some photos of the shelving going into the living room. Can't wait till they are finished!!!


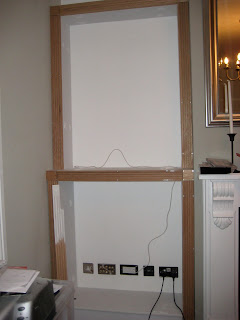

Stage 1

Stage 2


Almost finished!! Now for some shelves
The kitchen floor
Well not the most imaginative title ever, but quite nice all the same. Tells you exactly what you're going to get in this post. More whittering on about the kitchen floor. Now you may not remember that many months ago when the kitchen we finished I spent hours staining them. The only problem was that the perfectionist that I married wasn't quite happy with the color and when we started finishing all the rest of the wood floors he decided these had to be redone to match.
Now grumble I did because I knew exactly who would be spending back breaking hours crouched on their hands and knees doing this task and all I could see was acres of bare wood. Still for marital bliss and knowing that I was going to lose the argument anyways I agreed. So in came the sander and off came the stain. We've now used the same stain as the rest of the downstairs and are actually much happier with the result. Because the product we used actually sinks into the wood you get a nice dark color without loosing the wood grain.
I hate it when he's right. ;) Here are some photos:

The bare wood post-sanding

Our Skadinavian Chic kitchen (temporarily)

The stained wood pre-varnish


The final product!
Subscribe to:
Posts (Atom)